MIDI Designer Pro X was released on NAMM Thursday (January 25, 2024) and is available in 175 countries in English, French, Spanish and Italian.
MIDI Designer Pro X (MDPx) is the culmination of over a decade of relentless iteration. In 2012, we launched MIDI Designer Pro, which we relaunched in 2016 as MIDI Designer Pro 2. MDP2 was critically acclaimed as the only professional-grade MIDI controller built for iOS from the ground up. In that decade, we have released over 80 updates to the App (changelog). Our Community has grown and our library of user-created content covers over 300 MIDI targets from all parts of the music-making world. In 2024, we take a significant leap forward with MDPx: MDPx elevates the user experience to new heights on iPad and Mac, but particularly advances the usability for iPhone users. A new subscription model — Premium — allows even more users to use the App in their music-making and discover MIDI Designer for themselves.
What’s New
Pricing and Premium versus Free
MIDI Designer has been a one-time purchase since launch in 2012. The sticker price was a bit of a shocker, especially for iPhone users. Before MDPx, users had no way to explore the App for their particular use-case without fully committing. All of this changes with MIDI Designer Pro X.
MIDI Designer Pro X is free to download. Most core and even advanced functionality familiar to MIDI Designer users is available without Premium. Users who wish to take full advantage of MDPx will want to subscribe to Premium. Users can choose to activate Premium for just their platform or for all platforms. Users can subscribe on a monthly or yearly basis, unlocking Premium functionality for:
Mac/iPad/iPhone
Mac Only
iPad/iPhone
iPad Only
iPhone Only
Here’s the breakdown by feature set:
Feature
Without Premium
With Premium
Professional-Grade MIDI Controller for iOS & macOS
Yes
Yes
Controls Types (Knobs, Sliders, XY Pads, etc.)
All
All
All Connection Types (Wi-Fi, Bluetooth, USB)
Yes
Yes
Access to Community Layouts
Yes
Yes
Full MIDI Spec Support
Yes
Yes
Control Relationships (Supercontrols & Subcontrols)
Yes
Yes
Superpowers (Ableton Link, Loopers, etc.)
Yes
Yes
Maximum Number of Controls per Layout
Unlimited
Unlimited
Maximum Banks/Pages per Layout (iPhone)
1/1
8/48
Maximum Banks/Pages per Layout (iPad)
2/2
8/48
Popup Panels
No
Unlimited
LED Colors Choices (per Page & Control)
No (Basic Green Only)
Unlimited
Page Textures and Color Choices
No (Default Gray, Basic Texture)
Unlimited combinations
Improved iPhone Experience
We’ve overhauled MIDI Designer’s UX on iPhone. This extensive rework greatly expands discoverability, usability and power. iPhone now fully supports portrait orientation and allows for better use of screen real estate.
Most importantly, however, iPhone users can seamlessly use all layouts including those originally designed for iPad and Mac. Users will find that without requiring any adjustment or changes.
See this YouTube short for a quick look into iPad layouts on iPhone
For a deeper look at the iPhone interface for MDPx, see this video:
Spaceship Theme and Display Version Options
In MDPx we’ve introduced our first Global Display Version — Spaceship 🛸 — that can be pieced apart and used with other Display Versions. Spaceship contains four toggles — tick marks, numeric indicator, fill, and handle — each of which may be turned on or off. This can be applied to the entire layout and to indivual controls. And what’s more: Control Display Version Options can be applied to the theme for MDP2 — Glow — as well as Classic which we rolled out with the original MIDI Designer Pro. Talk about a reboot!
Improved File Management
We’ve reworked all file operations on all platforms to allow users to save and load from anywhere in the iOS filesystem without leaving the App. In addition, the Image Manager now has the full Photo library capabilities iOS users expect.
Users also have the ability to resize layouts to portrait or landscape orientations.
New: MIDI Designer Meters
We’ve released MIDI Designer Meters, a new, headless VST/AU. This plug-in sends VU meter RMS or Peak signals back to MIDI Designer via host automation. Unlimited instances in your DAW + the Meter control in MIDI Designer make this a very powerful tool to represent audio feedback in your layout.
MIDI Designer Meters were created in conjunction with Audiodevs and are available immediately at:
Now available for all users without special purchase:
Automatic Cloud Backups via Dropbox, now standard for all users.
Integration of the Streambyter Plugin is now standard for all users.
Addition of Pickers, Image Panels, Custom Images and Meters
Behind-the-scenes enhancements to ensure the future viability and support of MD.
Lots of UI refinements and fixes that we never got to do to control features and functionalities.
Elevating the MIDI Designer Legacy
MDPx adopts the legacy of MIDI Designer Pro 2 — enriched by over 12 years of development and 80+ updates — ensuring a seamless transition packed with exclusive MIDI Designer features:
Solid MIDI Communications Infrastructure: Over 10 years of development, ensuring reliable and robust MIDI interactions over Network, Bluetooth and USB.
Active Community of Authors: A vibrant ecosystem supporting legacy and current music synthesizers, sound engines, DAWs, and all MIDI-controlled devices.
Extensive User Layout Library: More than 320 layouts for over 70 manufacturers, contributed by the community.
Comprehensive Support: Whether you’re just starting or tackling complex MIDI implementations, with the Community we are here to assist.
MIDI Designer’s ‘Superpowers’: A suite of powerful features exclusive to MIDI Designer that we have developed over the last 10+ years. These include:
Ableton Link and Link Control Loopers
Supercontrols and subcontrols as the basis for many features:
Snap sub to value over time
Sequential subs
Subcontrol chaining
Button groups (radio buttons) with Bounceback™
Steppers
Live Transpose
Group Presets
Named Ticks
Simplified Sysex Messages with variables and bit changers
Snap to Value
Global Presets
Pedalboards
Popup Panels (Show/Hide)
Enable/Disable Controls
Two-up Page Layout for iPad/Mac
Loyalty Benefits
MIDI Designer Pro X values its long-standing user community. As a token of appreciation, legacy users are entitled to special benefits:
Everyone who purchased MIDI Designer Pro 2 prior to our switch to subscription on January 25, 2024 will have lifetime access to all existing features before the 10.0 update.
What, when, where? Requirements, Release Date and Availability
Compatibility
Requires macOS 13.0 or later with Apple Silicon chip.
Requires iOS 16.0 or later. Compatible with iPad, iPhone and iPod touch.
Available in English, French, Italian and Spanish.
Availability
MIDI Designer Pro X was released in 175 countries on the morning of January 25, 2024, coinciding with the NAMM Winter Show where MIDI itself turned 40. Exciting times!
We will be updating our subscription policy to honor commitments to prior purchases.
However, Dan is off the grid this weekend and enjoying some time off from the big push for Pro X.
Standby for an update next week. No subscriptions should be charged for prior users before that point as prior users originally had a free year.
Update from Feb 20, 2024
Our users have spoken! We changed policy on this topic as of 2024-02-20: All users who purchased MIDI Designer Pro (2012-2017) or MIDI Designer Pro 2 (2017-2024) prior to our switch to free + subscriptions on January 25, 2024 will have lifetime access to all existing features before the 10.0 update.
This change is already live on the App Store since 10.1.0.
The RD 2000 layout has been one of our classics since the first version was uploaded in 2018. There were multiple updates until the layout was mature (and completely full) in 2020.
Usually, when a board gets to ~ five years old, you do not expect much new content from the manufacturer. However, Roland recently released a V-Piano expansion pack for the RD 2000, based on a German Concert Grand. It includes 17 new tones built on the German Concert Grand model. (The supporting software update for the RD 2000 has two new expansions slots, so hopefully we will see another V-Piano expansion.)
The original update intent for the RD 2000 Manager was simply to add the 17 new tones to the picker. However, the improvements in MDP2 since the last Manger release meant there was lots of opportunity to improve functionality of the layout.
Updates include:
– Support for German Concert Grand
– Sound Chain Functional View
– Sympathetic Resonance Editor (from the RD 2000 Piano Manager)
– Interface Upgrades and simplification
Sound design capability with the V-Pianos is nearly unlimited. While Roland provides 17 new tones, you can use the V-Piano Designer and Individual Tuning to create your own sounds based on the German Concert Grand. The RD 2000 Piano Editor layout provides a set of tools to simplify customizing your piano design. (Check back – we expect an update to the Piano Editor based on the new German Concert Grand content.)
MIDI Designer Pro has multiple community layouts (editors) for classic (and current) Roland Synthesizers. From the Integra-7 to the Jupiter X(m), MDP2 has a solution. Not just synths, but pianos and effects.
Our users have shared quality, comprehensive, performant layouts for the A-01, Alpha Juno PG-300, Boss Katana, D-50, FA-06, Fantom X, GR-55, Integra-7, JD-990, JU-06, Jupiter X(m), Jupiter-8 (Groove Mod), JX-3P, JX-8P, MC-303, MKS-30, MKS-50, MKS-80, RD-2000, RD-88, SH-01a, TB-3 Bassline, and VG-99
Most MIDI Designer layouts are for iPad, and few have been ported to iPhone. Ibo Kai has broken this rule with his new layout for the Yamaha reface CS [ see all of Ibo Kai’s layouts ]
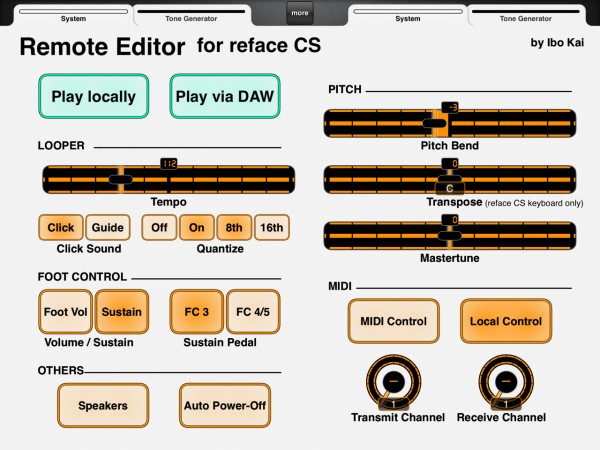
iPad Layout, Author’s Notes: Remote Editor for Yamaha Reface CS
To avoid the complicated procedure for system settings in Reface CS (switch off, press + hold a certain key – remember which key to use for which function -, switch on again) I made this layout for quickly and easily changing things. Because they are all controllable via MIDI sysex! I can switch the internal speakers on and off, engage or disengage local control, change the pitch bend range etc. remotely from the iPad. Additionally I added two (green) buttons at the top for what I use most often: switching on both the internal speakers and local control, when I want to play Reface on its own, or switch both off, whenever I play it via my DAW.
This layout is based on Reface firmware 1.30, which introduced a number of new functions: for example in the looper you can now switch between the Guide Sound (currently set sound) or a Click Sound. Furthermore you can quantize your recordings to either 8th or 16th notes. Naturally if your firmware is older, you will not be able to control these, however the other controls should still work fine.
The second page is doubling the Reface onboard sliders for setting the sound. This is simple MIDI CC and I added it mainly for use when I want to record changes on the PC, while the synth is out of reach of my hands.
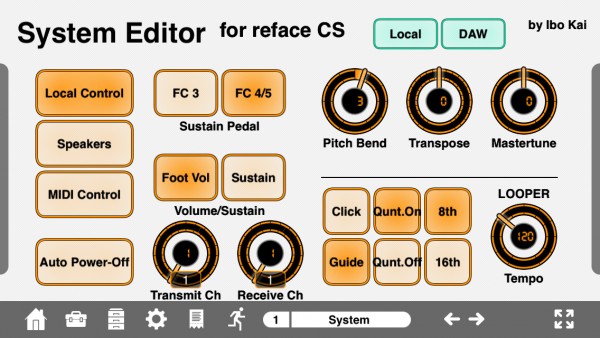
iPhone Layout, Author’s Notes: Reface CS System Editor for iPhone
I made another version of the Reface CS editor for my iPhone. The layout is slightly different due to the small screen. Also I skipped the second page, the sound controls would´t really make sense in this size. Apart from that it´s all there, including the two additional buttons I made for quickly changing according to the playing situation: locally with local control and speakers on and playing via DAW, with local off and speakers off. Now I can use my iPhone for quick changes of system settings even when my iPad is away, busy with other things.
Two new, standalone iPad editions of the award-winning professional MIDI controller platform bring MIDI control to the Reface DX
Update March 7, 2017: MDDX1 and MDDX2 are now live on the App Store.
New York, NY – February 14, 2017 – Confusion Studios announced two new MIDI controller apps for iPad, both of which will be available for download from the Apple App Store on Wednesday, March 1, 2017: MDDX1 and MDDX2.
Both of the new apps are MIDI controllers for the Yamaha Reface DX. Yamaha released the Reface DX – a portable, FM-synthesis-based keyboard – in 2015 to critical acclaim. Each of the new apps is based on a user-created layout for MIDI Designer Pro 2; each has a unique approach to controlling the Reface DX.
The Editor: MDDX1 by Helfried
MDDX1: Voice Editor for Yamaha Reface DX by Helfried Wildenhain highlights this user-author’s eye for design, a deep attention to detail, and a desire to push the underlying platform – MIDI Designer Pro 2 – to do new things. It allows for control of every parameter on the Reface DX and provides surprising new control vistas. The App extends the reface DX’s interface, providing a much-needed algorithms display, Master Tune, Transpose, Randomize and other new sections.
MDDX1 will run on any iPad with iOS 9.3 or better, and will be available on March 1, 2017 for download for $9.99. The app purchase may be applied towards a bundle purchase including MIDI Designer Pro 2.
MDDX1: Voice Editor for Yamaha Reface DX by Helfried Wildenhain
Performance Tool: MDDX2 by Ibo Kai
MDDX2: Performance Tool for Reface DX by Ibo Kai is an additional, performance- focused interface for the Reface DX. As the author of the layout puts it, “This layout is pretty simple, just one page shows all the available functions. It is mainly what you find in the ‘FM’ keypad of the synth: frequencies, levels and feedback settings separately per operator plus the algorithm select.” In addition, Ibo Kai added an Amp Mode section. This auxiliary controller for the Reface DX is intended for live and studio performance, where a full-blown editor is not practical.
MDDX2 will run on any iPad with iOS 9.3 or better, and will be available on March 1, 2017 for download for $3.99. The app purchase may be applied towards a bundle purchase including MIDI Designer Pro 2.
MDDX2: Performance Tool for Reface DX by Ibo Kai
Two New Standalone, Dedicated Apps
MIDI Designer Author and Confusion Studios CEO Dan Rosenstark notes, “Both editors show the layout authors – Helfried and Ibo Kai – flexing design muscle and pushing the MIDI Designer platform to work in new ways. Each is a dedicated tool for working with the Reface DX and each provides a surprising and useful new interface for this small keyboard. Additionally, both provide new users with an entry point into the MIDI Designer platform at a low price.”
MDDX1 and MDDX2 join the four existing standalone MIDI Designer apps for dedicated control: MIDI Designer XW: Casio XW Solo Synth Controller, MD77: Voice Editor for Yamaha SY77/TG77 by Ibo Kai, MDClav: Clavinova Controller by Craig Knudsen and MDXG: XG Sound Set Controller by Craig Knudsen.
About MIDI Designer
Released by Confusion Studios LLC in 2012, the award-winning MIDI Designer Pro 2 has been lauded by Music Industry publications and used on stage and in the studio by world-class musicians, producers and DJs around the World. MD boasts a large Community of users creating and sharing virtual MIDI controllers for a multitude of different MIDI targets. Used by everyone from VJs to robotics experts, MD has also recently made inroads into television and film in both lighting design and camera control.
MIDI Designer Pro 2 will run on any iPad, iPhone or iPod touch running iOS 9.3 or later. The standalone, dedicated versions of MIDI Designer all require an iPad running iOS 9.3 or better.
This is an interview with Theodor Galanis. Theodor is a brilliant guy and a well-known music technology evangelist. A discussion on FB about live rigs and improvisation piqued my curiosity, and I wanted to learn more about his rig. This interview was conducted on Google Hangouts in February 2016.
Dan
Let’s start from the musical side of things. Pretty soon we’ll hit the physical topology — I see you’re rocking those BCR-2000’s, I know you’re a Lemur expert and I”m pretty sure you’re using Ableton. But first: what kind of music are you producing with your rig?
Theodor
I am mainly interested in making tecnho music – which may sound kinda vague given that this genre has a lot ermmmm……divergent subgenres….Anyways think huge bass-y kick drums, driving basslines, NOT an excessive useage of effects and swooshes and stuff like that….and usually some sequenced synth riff on top of it all to make you want to dance….I think this pretty much covers it.
Dan
And your goal is to show up at the gig (or in the studio) and improvise new music using an essentially fixed rig?
Theodor
Yeah well I have been DJing for quite some time now but I was always fascinated by the posssibility of making the music right there, real time….as opposed to DJing. Of course seeing artists like Tim Exile or Beardyman had a huge impact on me. So….while a couple of years ago, producing music was a different “era” and playing music for people as a DJ was something else….I now strive to combine the two in one. I came to the conlcusion this can only be achieved by either a huge investment in hardware or simply take advantage of my already purchased midi controllers plus a well thought, planned out fixed rig as you called it.
Dan
So we’ll call this your Live Rig, ok?
Theodor
Yup fine with me! ?
Dan
How does your Live Rig integrate with your DJing equipment? Same computer, different computer, CDJs for DJ’ing, etc.?
Theodor
Well actually when I started DJing I didnt have much cash to spend on equipment but I already had a laptop, was already producing and had already checked out the major “DJing” software out there. Coming from a production background, I chose to DJ with Ableton Live as it was far more fascinating for me to set up my own chains of effects, something I couldnt pull of with, say, Traktor which was up on my list. Then I figured I might as well add some extra “tracks” (audio channels) to play some loops on top of the ready-made tracks I DJed with.
So essentially this whole thing evolved after time into my Live Rig – you could say my Live Rig is also my DJing rig. The computer running all the show is an HP laptop with an i3 CPU and 4GBs of ram. NOT too much, but over the years I’ve learnt to optimise Windows for real time operations and Im extremely cautious with fishy websites and the likes, bloatware and all that stuff. It rarely, if ever fails me but I guess its also a bit of luck. It happened to turn out an OK machine.
Dan
Very cool: while we’re here I might as well ask if you’re using an audio interface? I’m guessing you are
Theodor
Yeah of course – thats a “must”. I have a Focusrite Scarlette 6i6 in my studio and a Native Instruments Audio 2 for the gigs – its small, but effective and reliable, plus very loud outputs. As you might guess, Im using one of its stereo outputs as the main output to the PA and the second one as “monitoring – cue”. All the mixing is done internally, in the box.
Dan
Great! The Scarlett stuff is relatively cheap and awesome. And yeah, the Audio 2 is loud and gives you just what you need: 4 outs! (Personally I cannot get my Audio 2 to stop glitching, but that’s another story/interview/article)
Theodor
Haha – try the driver that came with it – I think the later ones had some problems ?
Dan
Okay, will do!
So: let’s dive into the overall concept of the Live Rig. You said something on Facebook the other day about having a ton of MIDI tracks able to route through a bunch of different sound options. Can you explain that a bit, please?
Theodor
Oh yeah actually I love explaining that – I really want people to understand what is possible with today’s computers and software because its amazing.
So, prepare for a huge reply.
Theodor Galanis, Live Rig
Ableton & DJ Setup
In the software side of things I run Ableton Live. I have saved a project which features all the channels, all the effects, all the configurations and all the midi mappings I use minus the ready-made tracks for when I want to DJ. So essentially Im using this project as a “template” – since Live doesn’t have the luxury of saving project templates.
Diving into this, I’ve got 4 audio tracks which are for DJing purposes – I simply drop the tracks I want to play when I’m DJing in them.
16 Channels with Sampler
Next up I have 16 channels all consisting of a native Ableton’s Sampler. These channels are grouped into two groups of 8 and are color-coded differently. These serve as my drum machines. Each of these consist of Sampler instance where I utilise the “zone multisampling” feature. Most current software samplers allow you to “map” different samples to the same key (in what they call “zones”) – note and trigger a different one according to velocity – this helps for current samplers’ realistic sound. The interesting part however is that in Ableton Live the Sampler “sample slot” can be midi mapped directly as opposed to being “selected” by velocity. So to get the picture of this, imagine a simple midi channel with a Live Sampler named “Kick” where I have specifically chosen kick drum samples, imported them into the Sampler and then have a simple MIDI mapped control to “select” the sample (that is, imported kickdrum) that will be triggered by a specific note. Since MIDI can send up to 128 discrete values ( 0 – 127) I can pretty much create “drum sets” made out of samples which are made out of 128 possible kick drums, toms, percs, etc etc – 8 channels in total – 128 sounds per channel – x2.
The x2 part is because the audience, being accustomed to the DJ styled rapid changes of beats I figured I needed two completely independent drum machines so that I can mix the one with the other as a DJ does. Otherwise the whole thing gets too ermmmm slow in progression, which is fine if your audience is expecting a live show….but not OK when you have to be on par with DJs and all that clubbing culture.
These two sample-based drum machines are triggered by a Novation’s Launchpad. There is this guy, Motscousus who has released modified versions of Ableton PY controller scripts for the Launchpad. They basically transform it to the “poor guy’s Push” if I may say so. Amongst other goodies, they feature a step sequencer page, exactly like the one Push has: bottom left half of the pad-matrix serves as a drum selector, the top section is the sequencer and the bottom – right section is the loop-size selector.
Needless to say I have also midi mapped the most “sensible” parameters of those Samplers such as attack, decay, a couple of send FX channels and whatnot to add variation to my drum sequencing.
3 Instances of Massive + 1 Absynth
Next, I have 3 instances of Native Instruments Massive and one instance of Native Instruments’s Absynth. I have set those up to “receive” midi notes on specific channels (as opposed to default “omni – all”) – specifically they start from midi channel 3 up to 6. See, midi channels 1, 2 were reserved for midi mapping action (CC messages) and I didn’t want to mess up the whole thing. I wanted to know what is mapped where in the fastest way possible and keeping the midi channels separated like that, certainly helps when troubleshooting. Now there are two main things that led me to choosing these VST plugins
they both feature some kind of “macro-controls” so that you don’t have to map hundreds of parameters to midi controllers in order to control the sounds live. Each preset sound can “map” different parameters to these “macro controls” and all you have to do is midi map the macros, NOT the actual parameters. So according to the sound loaded, your simple 8 knob mapping will always control the parameters most suitable to the sound loaded.
The other reason was that both are compatible with midi program changes. You can create “banks” of 128 sounds (you know the drill, 0 – 127) and then simply select these sounds by sending MIDI program changes to the plug ins. This of course is handy for switching sounds live on stage.
Initially I was trying to play these VSTs with Lemur – designed keyboards so I had also incorporated “looper” Live devices after the VSTs to be able to loop – record what I play on the fly. I completely abandoned the idea firstly because of the accumulated latency ( MIDI over wi-fi + the buffer size of my audio interface) and, because I have to admit Im not that much of a great keyboardist. So, here is where initially Arturia’s Beatstep came into my set up, which I then sold and replaced with a BCR2000 with a modified firmware that turns it into a full blown 32 – step sequencer. I won’t get into details about it but it rocks and if you have a BCR2000 laying around google “Zaquencer” and thank me later ( link ).
So, with the Zaquencer (modified BCR2000) I can sequence all four of these VSTs since it actually features 4 independent “tracks” – all with their own settings, as in midi channels, sequence length, etc etc.
Lemur + mTonic
As if all these weren’t enough, next up I have yet more 8 channels consisting of the “multi – outs” of the fabulus drum synthesizer “mTonic” by SonicCharge. It took me months to create a full blown Lemur controller for it, and frankly I couldnt leave it out of my set up even though it may be a bit of an overkill, having already those 16 drum channels I discussed initially. It does make some great bliipy noises though plus its fun to play with.
Lemur controlling Reaktor
The last, finally channel is one instance of Reaktor where a modified, Lemur – OSC compatible ensemble of “metaphysical function” is loaded. This serves as the main “drones – pads – atmos” synth. To be honest, it is kinda heavy so when it is not used I have midi mapped its “enable – disable” button (that litle “power” button all rack devices have in Live) and switch it off.
Send and Final Effects
Then I have 3 “send” channels – each of them featuring an effect chain. One reverb and two delays. I also have a compressor dropped after the reverb which is sidechained with a “silent 4 on the floor” kickdrum and the sidechain input level is midi mapped too so I can choose to completely eliminate the “rhythmic pumping reverb” effect (sidechain input level down to minus infinity).
The whooooole of these tracks end up in a “sub master” channel where I also have two basic filters, a High Pass and a Low Pass for those sweeping moments of drops, Live’s native limiter and then the whole end up to the master bus. Having a “sub master” channel helps when you want to monitor in your headphones what you send out to the PA. There is no “solo – cue” button on Live’s master bus but of course there is on any other channel regardless if you have routed it as such, to serve as a master bus.
Of course…..in most of all the channels I mentioned, a typical DJ-style EQ I have designed out of FX racks of Ableton live resides – and actually you can download that FX rack from my website – its the Ableton Live’s missing 3-band DJ-ing EQ. Also, after the VST synths I have added HP and LP filters and yet another sidechained compressor triggered by the same “silent” kickdrum – this helps un-clutter the mix by “ducking” a bit the synth sounds when the actual kick is heard – or simply add a rhythmic pumping effect.
Controllers
So pretty much this is where all the sounds come from. Now on the controlling side of things, besides the ones I already mentioned (Launchpad, BCR2000 Zaquencer) I have a second BCR2000 which has two pages: on one page the 4 audio tracks and all the effects are mapped – this is the basic DJing controller mode for me. When performing live music, a different page features the groups of those 8-channel drum machines, so thats like having two DJ decks only they are made out of the drum machines plus the effects mapped as per the first page.
One BCF2000 serves as a typical mixer for the 4 VST plug ins plus the mTonic master bus, plus the Reaktor channel and Lemur is there to control the lot in more details. With the great help of scripting, I have managed to save into “arrays” the drum slot selectors – essentially I can tap on a button and load “Kick drum no34”, “tom no23”, “perc no78″…..etc etc without having to manually change each drum sound on by one. Also in Lemur are all the midi program change messages for the VSTs and all those details.
I think I have covered most of the basics of my set up. Not to be misunderstood, this whole thing wasn’t created overnight. It has taken me roughly 3 years of adding or leaving out bits and pieces till I find what works and how, and of course I’m still experimenting with it.
Dan
So you have 8 Samplers for (kick, snare, hi-hat etc.) and then the same setup again (8 more channels), and you can switch between 128 samples on each. So you can choose a kick from 128 kick-like sounds, is that right?
Theodor
Yup, thats correct!
Dan
So those are controlled by a step sequencer running on your custom Launchpad. Is it… so when you look at the Launchpad, is it showing you the notes for one channel, e.g., tom 2?
Theodor
Yes that is correct. I can select the “visible” channel by tapping on one the bottom-left half of the pad matrix – but limited to only one of the 8-channel groups. To switch to the other 8-channel group I use either the top left-right arrows of the device or two “select” buttons I have on the BCF or Lemur.
Dan
Okay, which is why you need two 8-channel setups: otherwise you wouldn’t be able to “drop it!”
Theodor
Yeah exactly that….In my first ever Live gig, a year and a half ago, I only had one 8-channel group. The transitions were quite slow and I noticed that the crowd wasnt responding so well. Essentially it all sounded like a loop slightly changing over time. If I tried to change lots of drum sounds at once, then the whole thing sounded like an un-talented DJ was on decks. After that gig, I created the second 8-channel group. While the first one is playing, I can have the master out of the second muted, and start working on its pattern and then simply mix it in with the playing one – or, yeah just drop it.
Dan
That’s very cool. And I see you’ve got Lemur on iPad controlling Massive, Absynth, mTonic and Reaktor. How is it routing to the PC?
Theodor
Its connected via Wi-fi and the utility daemon software plus a third party virtual midi cable app, LoopBe 30. You might be asking now, if the latency isnt trouble – it was when I was trying to trigger actual notes with it. Since I have been using Zaquencver however I rarely use the midi “keyboards” in Lemur and well, truth be said. changing parameters in synths and mixers can be a lot more “forgiving” as far as latency is concerned.
Dan
And now in 2016 you’ve got more options for a direct connection, at least for MIDI (including the project that I’m a part of, musicIO).
Theodor
Yeah thats true – I have bought MusicIO, its a great app and Im definitely looking in ways to incorporate some iOS apps into the set up. The truth is, I have an archaic iPad2 so I rather wait till I have enough money to get me a more powerful iOS device – or even better, keep the iPad2 as a controller, and add a newer and more powerful iPad for actual sound source.
Dan
Good points, except that the iPad Pro — being bigger — offers new possibilities for controllers. Generally more controls and/or more clarity…
Theodor
Yeah choices…choices…so many choices. I think thats the main reason many people seem to prefer the analogue gear – unless you are way focused, you can be lost in all these choices and end up doing nothing. Frankly speaking I ‘ve fell too many times into this trap – there are some FX stuff in my Live Rig I still rarely put to good use in when performing. They seem like a good idea when designing the thing, but without constant practise, your fingers just wont go there while you are on stage.
Dan
So let me ask you about that. You’ve got several different controllers, multiple sound sources, etc. First, just to understand, when you’re playing, if someone comes up and says, “hi!” can you shake their hand, or are you too busy?
Theodor
Haha no actually I cannot shake their hand. I have to constantly change stuff in the background or mix it in, otherwise I risk of sounding too repetitive. Well ok, a fast shake wont hurt I guess but you get the idea.
Dan
definitely. So: how do you work with all this possibility? Let’s say you’ve just mixed in something on one of the 8-track drum machines. Where to you look next?
Theodor
Well, I try to take a “one by one” approach. So for example once I’ve laid out a drum pattern, I then move on to a synth pattern. Then when this is done, I add some variations to the drums then while doing those in the background Im preparing the next synth – when the next synth is done and while Im mixing it in, Im starting working on the second drum pattern. When the synths are mixed, I slowly mix out the “old” then proceed with the “switch” of the drum patterns and so on and so on. Of course, in this whole procedure the typical “cut the bass” (HP filter) then drop it with a change in something else helps a lot. And of course I have to be honest, I usually practice a lot before a live gig and I even write “notes”, actual notes on paper where I keep track of what presets I will load, with what drum sets they ll go together and all that stuff. Also, quite frankly, most of the times I dont keep up with the notes after a while – the whole process tends to ermmm get a mind of its own and I simply go where it takes me. But hey, thats the nice part of playing live isn’t it?
Dan
Yes indeed. Well thanks so much for speaking with me. Any gigs lined up that you want to mention, or anything else (FB Groups, etc.)?
Theodor
Well for gigs and all that stuff you can always visit my FB page at https://www.facebook.com/Softc0re
Of course I have to mention the iPad Musician FB group which is quite helpful and informed on all things iOS music and lastly I want to thank you for the invitation on this small chit chat. Also a big shout out to CannibalRadio.com where you can listen to my radio show every Tuesday.
Thanks again Dan, its been a pleasure.
Dan
Thank you again, it’s been inspirational! See you on the Interwebs, or perhaps in Greece or New York City or somewhere else!
Theodor
Haha, surely let me know if you ever come here in Greece. I’ll give a great tour around. ?
When it comes to digital keyboards, increased portability almost always means less direct control over program parameters, which necessarily take second priority to performance controls. Even with heftier workstation synths, the sheer number of features and options makes it impossible to dedicate physical controls for everything.
The compromise for packing a ton of functionality into a tidy little package usually comes in the form of a tiny LED screen and an intricate array of menus and submenus, all controlled by a “data knob”, and maybe a couple of buttons. Creating new presets means twisting and tapping through dozens (or hundreds) of menu options. Crafting the perfect sound can be a frustrating exercise lasting hours, or even days.
MIDI Designer Pro takes a lot of the pain and frustration out of digital synth programming by giving you the controls you need, allowing you to discover the sounds hidden behind those layers of menus. A great example is the control layout created by André Noller for the Akai Miniak (pictured above).
As many know, this synth was nearly un-editable (at least for me) because of the missing controllers and the ‘calculator-styled’ display with one (!) endless knob and a few shortcuts to get to the menus faster (but not fast enough if you ask me).
As you can see from just one of the many screens included in the layout, André’s custom controller offers a massive improvement in the programming workflow for this synth. The good news is, layouts like this are possible for most modern digital synths, and many have already been created and shared by members of the MIDI Designer community.
So save yourself some scrolling and tapping by heading over to the community shares, where you may just find a ready-to-use layout for your synth.